Have you ever wondered if you can enjoy fresh, nutrient-packed greens without a backyard? The answer is yes! Container spinach is a game-changer for anyone with limited space or a desire for year-round gardening.
This method lets you cultivate homegrown spinach indoors, avoiding common outdoor challenges like pests and bolting. With the right container and soil mix, you can grow lush, healthy leaves right on your balcony or windowsill.
But what’s the secret to thriving spinach in pots? It’s all about proper drainage, the right soil pH, and consistent care. Whether you’re a beginner or a seasoned gardener, this guide will show you how to make it work.
Key Takeaways
- Container spinach is perfect for small spaces and year-round gardening.
- Indoor gardening helps avoid pests and bolting issues.
- Use the right container and soil mix for healthy growth.
- Spinach thrives in well-draining soil with a pH of 6 to 7.
- Harvest leaves when they reach 4 inches tall for the best flavor.
Overview of Spinach Grown in Pots
Urban living doesn’t have to mean giving up on fresh, homegrown produce. With container gardening, you can enjoy a thriving spinach plant even in the smallest spaces. Whether you’re in an apartment or just short on yard space, this method is both fun and effective.
Why Choose Container Gardening?
One of the biggest perks of container gardening is its flexibility. You can place your pots on a sunny windowsill or balcony, ensuring your plants get the light they need. Plus, it’s a great way to avoid pests that often plague traditional gardens.
Another advantage is the ease of harvesting. With pots, you can keep your plants at a comfortable height, making it simple to pick fresh leaves whenever you need them. And if you’re wondering, “How many spinach plants per 5-gallon bucket?” the answer is about 3-4, depending on the variety.
Spinach thrives with 4-6 hours of light each day, making it perfect for sunny spots. It’s also less prone to bolting in containers, as you can control the soil and moisture levels more effectively. For me, this method has made maintaining a small, manageable garden a breeze.
Benefits and Challenges of Container Spinach
Want fresh greens but lack garden space? Container gardening might be your solution. It’s a fantastic way to grow spinach even in small areas. Plus, you’ll have full control over the environment, ensuring your plants thrive.
One of the biggest advantages is the ease of maintenance. You can move pots to sunny spots or indoors during bad weather. This flexibility helps avoid common issues like pest infestations and disease outbreaks. I’ve found that proper care, like regular watering and thinning, keeps my plants healthy.
However, there are challenges. Overcrowding is a common problem. If you don’t thin seedlings, they compete for nutrients, leading to stunted growth. I recommend spacing them 4-6 inches apart for optimal development. Another issue is germination. Spinach seeds need cool soil (45-65°F) to sprout, so timing is crucial.
Here’s a quick comparison of benefits and challenges:
| Benefits | Challenges |
|---|---|
| Ease of maintenance | Overcrowding |
| Control over environment | Germination issues |
| Pest and disease prevention | Proper spacing required |
To overcome these challenges, start with high-quality seeds and ensure proper soil drainage. Thin seedlings early to give each plant enough room. With these tips, you’ll enjoy a bountiful harvest of fresh greens.
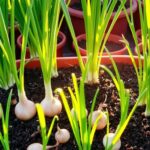
Choosing the Right Container for Spinach
Selecting the perfect container can make all the difference in your gardening success. Whether you’re a beginner or an experienced gardener, the right planter ensures your plants thrive. Let’s dive into the essentials of picking the ideal setup.
Optimal Container Size and Depth
How big of a container do you need for spinach? For healthy growth, aim for a planter that’s at least 14 inches in diameter and 6-8 inches deep. This size provides enough space for roots to spread and prevents overcrowding.
I’ve found that larger containers, around 18 inches wide, work even better. They allow for proper spacing, which is crucial for nutrient absorption. Remember, a cramped planter can stunt growth and reduce yield.
Importance of Drainage and Material
Drainage is key to avoiding soggy soil and root rot. Always choose a container with multiple drainage holes. If your planter doesn’t have enough, you can easily drill more.
Material matters too. Terracotta is great for breathability, while plastic retains moisture longer. Grow bags are another excellent option—they’re lightweight, portable, and promote air pruning for healthier roots.
For the best results, use a high-quality potting mix enriched with compost. This combination ensures proper drainage and provides essential nutrients. I recommend a blend of 1/3 drainage material, 1/3 water-holding material, and 1/3 organic matter.
Selecting the Best Location: Full Sun or Partial Shade?
Finding the perfect spot for your greens can make or break their growth. Spinach thrives in specific light conditions, and understanding these needs is crucial for a successful harvest. Whether you’re planting outdoors or indoors, the right balance of sun and shade ensures healthy leaves and prevents issues like bolting.
Ideal Light Requirements for Spinach
Spinach needs 4-6 hours of light daily to grow well. In cooler weather, full sun works best. However, during summer, too much direct sunlight can cause the plant to bolt, leading to bitter leaves. I’ve found that morning sun with afternoon shade is ideal for warmer climates.
Temperature plays a big role too. When the temperature rises above 80°F, spinach is more likely to bolt. To avoid this, I adjust the plant’s location based on the season. For example, in spring, I place pots in full sun, but as summer approaches, I move them to shadier spots.
Balancing Sun and Shade Exposure
Balancing sun and shade is key to keeping your spinach healthy. In cooler months, full sun helps the plant grow quickly. But in warmer seasons, partial shade prevents overheating. I recommend placing pots on the east side of buildings for morning sun and afternoon shade.
Here’s a quick comparison of full sun vs. partial shade:
| Condition | Benefits | Challenges |
|---|---|---|
| Full Sun | Faster growth in cool weather | Risk of bolting in summer |
| Partial Shade | Prevents overheating | Slower growth in cooler months |
By monitoring temperature and adjusting light exposure, you can enjoy a steady supply of fresh greens throughout the year. My personal tip? Test different locations and observe how your plants respond to find the perfect spot.
Essential Guidelines for Planting Your Spinach
The foundation of a thriving garden lies in how you plant your seeds. Whether you’re a beginner or an experienced gardener, mastering the basics ensures your greens flourish. From spacing to depth, every detail matters for a healthy harvest.
Proper Spacing and Number of Plants per Container
Can you plant spinach close together? While it might seem efficient, overcrowding can stunt growth. Each plant needs about 3-5 inches of space to thrive. This allows roots to spread and leaves to grow without competition.
For a 12-inch wide container, I recommend planting 3-4 seeds. Once seedlings emerge, thin them to maintain proper spacing. This ensures better airflow and nutrient absorption, leading to healthier plants.
Seed Sowing Depth and Succession Planting
How deep should you plant your seeds? Aim for no more than half an inch deep. This depth provides the right balance of moisture and light for germination. I’ve found that planting too deep can delay sprouting.
Succession planting is another game-changer. By sowing seeds every 2-3 weeks, you can enjoy a continuous harvest throughout the spring and fall. This method ensures you always have fresh greens ready to pick.
- Prepare your container with well-draining soil and proper spacing.
- Sow seeds no deeper than half an inch for optimal germination.
- Thin seedlings to 3-5 inches apart for healthy growth.
- Use succession planting for a steady supply of fresh leaves.
By following these guidelines, you’ll set the stage for a lush, productive garden. Proper planting techniques are the key to reducing competition and encouraging robust growth.
Expert Guide to Growing Spinach in Containers
Mastering the art of cultivating greens indoors can transform your space into a mini garden oasis. With the right techniques, you can enjoy fresh, homegrown spinach year-round. Here’s my expert guide to help you succeed.
Start with a high-quality mix for your potting soil. A blend of 1/3 drainage material, 1/3 water-holding material, and 1/3 organic matter works wonders. This ensures proper drainage and provides essential nutrients for your plants.
Light is crucial for healthy growth. Place your pots on a sunny windowsill where they can get 4-6 hours of sunlight daily. In warmer months, partial shade prevents bolting and keeps leaves tender.
Here are my top tips for thriving greens:
- Use a balanced slow-release fertilizer to nourish your plants.
- Thin seedlings to 3-5 inches apart for better airflow and growth.
- Rotate pots occasionally to ensure even light exposure.
Reputable nursery sources recommend cultivars like ‘Space’ for mildew resistance and ‘Giant Winter’ for cold tolerance. These varieties are perfect for indoor cultivation and provide consistent yields.
Small changes in your routine can make a big difference. For example, consistent watering and monitoring soil moisture levels prevent stress and promote lush growth. With these expert practices, you’ll enjoy a steady supply of fresh greens.
Watering and Temperature: Keeping Your Spinach Healthy
Proper hydration and temperature management are key to thriving greens. Without the right balance, your plants can struggle with issues like wilting, bolting, or pest infestations. Let’s dive into the essentials of maintaining healthy leaves.
Optimal Watering Schedule and Practices
How often should you water your greens? I recommend watering deeply once a week, ensuring the soil stays moist but not soggy. Check the top inch of soil—if it feels dry, it’s time to water. This approach minimizes leaf wetness, reducing the risk of disease.
Morning is the best time to water. It allows leaves to dry before evening, preventing fungal growth. Avoid overwatering, as poor drainage can lead to root rot and attract pests.
Managing Temperature and Preventing Heat Stress
Temperature plays a big role in plant health. Greens thrive in cooler conditions, ideally between 45-75°F. When temperatures rise above 80°F, plants may bolt, producing bitter leaves. To prevent this, I move pots to shadier spots during hot afternoons.
Here’s a quick comparison of watering and temperature practices:
| Aspect | Best Practices | Common Mistakes |
|---|---|---|
| Watering | Deep watering once a week | Overwatering or inconsistent schedules |
| Temperature | Keep below 80°F | Exposing plants to prolonged heat |
Using liquid organic fertilizer every 2-3 weeks also helps. It provides essential nutrients, promoting steady growth and a healthy crop. By combining proper watering, temperature control, and fertilization, you’ll enjoy vibrant greens all season long.
Managing Regrowth and Preventing Bolting
Keeping your greens productive and healthy requires smart management of regrowth and bolting. With the right techniques, you can enjoy a steady supply of tender leaves and avoid bitter, flowering plants. Let’s explore how to encourage regrowth and delay bolting effectively.
Tactics for Encouraging Leaf Regrowth
Will your greens grow back after cutting? Yes, they will! To encourage regrowth, clip the outer leaves first. This allows the inner leaves to continue developing. I’ve found that harvesting in the morning, when plants are hydrated, promotes faster recovery.
Make sure to leave at least 2-3 leaves on the plant. This ensures it has enough energy to produce new growth. Consistent watering and a balanced fertilizer also help maintain healthy regrowth. With these practices, you can enjoy multiple harvests from the same plant.

Tips to Delay or Stop Spinach Bolting
Bolting occurs when plants flower, leading to bitter leaves. To prevent this, keep your greens cool. Move pots to shadier spots during hot afternoons. I also recommend planting bolt-resistant varieties like ‘Correnta’ or ‘Tyee.’
Proper spacing is another key factor. Overcrowding increases stress and speeds up bolting. Maintain 4-6 inches between plants to reduce competition for nutrients and light. Additionally, harvest leaves before they mature fully. This keeps the plant focused on leaf production rather than flowering.
- Clip outer leaves first to encourage regrowth.
- Keep plants cool to delay bolting.
- Harvest leaves early to maintain flavor and texture.
- Use bolt-resistant varieties for better results.
- Ensure proper spacing to reduce pest pressure.
By following these tips, you can enjoy a continuous yield of fresh, flavorful leaves. Managing regrowth and preventing bolting ensures your garden stays productive and healthy all season long.
Companion Planting and Sunlight Needs for Nearby Vegetables
Companion planting is a smart way to boost your garden’s health and productivity. By pairing the right vegetables, you can create a harmonious ecosystem that maximizes space and reduces pests. Let’s explore how to integrate companion plants like tomatoes, carrots, and peppers with your spinach plant for optimal results.
Good Companion Plants for Spinach
What is a good companion plant for spinach? Tomatoes, carrots, and peppers are excellent choices. Tomatoes provide dappled shade, which helps prevent bolting during hot weather. Carrots, with their deep roots, don’t compete for nutrients, making them ideal neighbors. Peppers, on the other hand, deter pests naturally.
Another great option is garlic. When planted a bit away from spinach, it repels aphids and other pests. Beans and peas are also beneficial, as they fix nitrogen in the soil, enriching it for your spinach plant.
Integrating Veggies Like Tomatoes, Carrots, and Peppers
Integrating these vegetables into your garden is simple. Plant tomatoes on the north side of your spinach plant to provide shade without blocking sunlight. Carrots can be sown in the same row, spaced about 6 inches apart. Peppers should be placed a bit further to avoid overcrowding.
Using a bag to create a microclimate can also help. For example, placing a clear plastic bag over young plants protects them from frost and retains moisture. This method is especially useful in cooler seasons.
| Companion Plant | Benefit |
|---|---|
| Tomatoes | Provide shade, prevent bolting |
| Carrots | Deep roots, no nutrient competition |
| Peppers | Natural pest deterrent |
| Garlic | Repels aphids and pests |
By combining these plants, you’ll create a balanced garden that thrives naturally. Companion planting not only improves yield but also reduces the need for chemical interventions. My personal experience has shown that these pairings lead to healthier plants and a more productive garden.
Enhancing Your Spinach Yield with Smart Practices
Maximizing your leafy greens’ potential starts with smart nutrient strategies. A balanced approach to fertilization and careful monitoring can significantly boost your harvest. With the right techniques, you’ll enjoy a steady supply of fresh, healthy leaves.
Nutrient Strategies and Fertilizer Use
Leafy greens don’t require a lot of fertilizer, but they do benefit from added nutrients. I recommend using compost or organic liquid feeds to enrich the soil. These provide essential nutrients without overwhelming the plants.
Here’s a quick guide to applying fertilizer effectively:
- Use a nitrogen-rich fertilizer every 2-3 weeks during the growing season.
- Apply compost at planting to improve soil structure and nutrient content.
- Monitor plant response and adjust feeding as needed.
Proper harvesting also plays a role in maximizing yield. Clip outer leaves first, leaving the inner ones to continue growing. This encourages repeat harvests and keeps the plant productive.
Monitoring and Adjusting Nutrient Levels
Seasonal changes can affect nutrient needs. In cooler months, plants grow slower and require less fertilizer. During warmer periods, increased growth may demand more frequent feeding. I keep a close eye on leaf color and growth rate to determine when adjustments are needed.
Here’s a comparison of nutrient sources and their benefits:
| Nutrient Source | Benefits |
|---|---|
| Compost | Improves soil structure, adds organic matter |
| Organic Liquid Feeds | Provides quick nutrient absorption |
| Slow-Release Fertilizer | Ensures steady nutrient supply over time |
By making small adjustments in care, you can achieve a lot in terms of productivity. Consistent monitoring and timely fertilization are key to a thriving crop.
Seasonal Considerations and Planting Timelines
Timing is everything when it comes to cultivating healthy greens in different climates. Whether you’re planting in spring or fall, understanding the best time to start can make a significant difference in your harvest. Let’s explore how to plan for each season and adjust to warmer weather conditions.
Planning for Spring, Fall, and Warm Weather Adjustments
Can you plant in May? Yes, but with some adjustments. In cooler regions, spring is ideal for starting your greens. Aim to plant when soil temperature is between 45°F and 70°F for optimal germination. For fall, begin 6-8 weeks before the first frost to ensure a steady yield.
During warmer months, heat can cause plants to bolt. To prevent this, choose bolt-resistant varieties and provide afternoon shade. I’ve found that moving pots to shadier spots during the hottest part of the day helps maintain leaf quality.
Here’s a quick guide to planting timelines:
- Spring: Plant 4-6 weeks before the last frost date.
- Fall: Start 6-8 weeks before the first frost.
- Warm Weather: Use shade cloths or move pots to cooler areas.
Watering and fertilizing schedules also need to adapt to the season. In cooler months, plants require less frequent watering. During warmer periods, check soil moisture every week to prevent drying out. A balanced fertilizer applied every 2-3 weeks supports steady growth.
“Precision in planting depth and timing ensures healthier plants and a more productive garden.”
For example, planting seeds half an inch deep and spacing them 3-5 inches apart promotes better airflow and nutrient absorption. By adjusting your care routine to match the season, you’ll enjoy a continuous supply of fresh greens.
Conclusion
Growing your own greens at home is easier than you might think. With the right plant care, you can enjoy fresh leaves year-round. Make sure to choose a container that’s at least 6 inches deep and provides proper drainage. This ensures your seed has enough space to thrive.
Proper spacing is key. Leave about 3-5 inches between each plant to avoid overcrowding. Regular watering and seasonal adjustments will keep your greens healthy. For example, in warmer months, move pots to shadier spots to prevent bolting.
Experiment with companion planting to boost growth and deter pests. Pairing your greens with tomatoes or carrots can create a balanced garden. By following these tips, you’ll have a steady supply of fresh, nutritious leaves. Start today and enjoy the rewards of homegrown greens!